garage is not heated and it’s 5 degrees outside 🙁Positioned and installed heater and glovebox shell. I’ve begun the wiring process.Heater Install – or – NOTHING goes easilyI found a heater kit for a BackDraft kit and jumped on it, being able to save some money over the kit from my manufacturer. I was in tall cotton, or so I thought. When I studied the kit, it was designed to be mounted in the engine compartment on the passenger side footbox. Not exactly period correct. No big deal, I’ll use the parts and put it behind the dash. Famous last words.Twice I fabricated an aluminum plenum, mounting it behind the dash, over the passengers footbox. I was going to definitely lose glove compartment space but I was up to a challenge. The more I worked on it, the more I came to realize, it wasn’t going to work out. The combination squirrel cage fan and heat exchanger was just too big for the space available. If I wasn’t hung up on being period correct, I could easily fit it into or on the footbox. But that just wasn’t going to happen.Back to the internet, research available heaters. The factory supplied kit was a 7 x 7 x 7 box with vents. I found the supplier of the box to be Maradyne Corp. in Cleveland, OH. A little more research and it turns out that Southern Air Hot Rods sells the unit at a very reasonable price. I could couple this with the ducting from the kit purchased earlier and be back in the saddle.The heater arrived. More challenges. It just does fit thru the bottom side of the dash. Need to be sure I can get it in and out with the body installed. The mounting studs are about 1/2″ too long. With them trimmed, you can wiggle the heater in and out – but you do need to hold your tongue in a certain way to get it done! ! ! man, talk about a tight fit.Checking the unit, I found a couple problems. When the fan turned, if the vents are full open, it hits the two side vents. Fire up my trusty die grinder and trim some clearances. The heat exchanger is held into the box with four sheetmetal screws. Mine were the wrong size – they would have quickly rattled out. Go to my parts bin and find four of the correct size. If you use the same fan, make sure you check it out before mounting it.The box has three flap doors that can be opened to let heat into the cockpit. There are also two round plugs that can be removed to add ducting for the defrosters. I used 1 1/2″ PVC fittings and 2″ vinyl hose to run to my defrost ducts. If you are building a similar setup, the defrost ducts are available from Vintage Air.Routing the hose in the engine compartment was non-eventful. I did install a shut-off valve in the feed line. The footbox gets warm enough in the summer, don’t need any additional heat when I don’t want it.Putting a heater and a glove box into the same vehicle can be a little tricky. These photos show the beginning of my modifications to accept the Hurricane heater (Maradyne brand) and my home-made glovebox..I made the glovebox by stacking and trimming foam to the size that would fit the area and trimmed for the necessary clearances. Once it was the size and shape I wanted, I then covered it with aluminum foil to serve as a mold release, then built up the exterior with fiberglass.The heater has two outlets for the demister. The stock Hurricane kit doesn’t allow use of the one on the drivers side. I elected to modify the cowl bracket so I can run a hose from each side to the Vintage air demister fittings. This change also allows all three flapper doors to be used.
This is work in progress, more pictures will be added as the project evolves.
 |  |  |
 |  |   Demister fitting
 |
  Modified cowl bracket
 |   |  |
 Note modification of end to clear heater
 |  Door Blank
1/2″ Baltic Birch
Door Blank
1/2″ Baltic Birch |  Installed face cover with padding.
Note gores around perimeter
Installed face cover with padding.
Note gores around perimeter |
 Belting for opening
 |  Test Fitting. Took multiple trims to make it fit and open properly
 |  Back view.
 |
 Opened. Inside cover to be installed later. Opened. Inside cover to be installed later. | 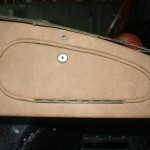 Finished
 |  My Dash
 |