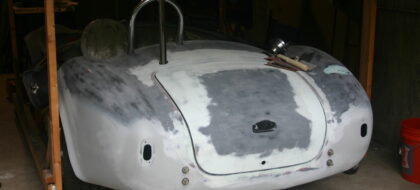
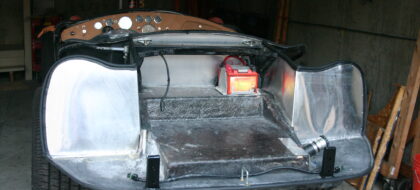
Finishing up all the little details. Car essentially done, appointment made for State Police inspection Sill moldingDifferent designs offer different methods of placing a trim piece. The trick is how do you transition from painted metal(fiberglass) to carpet and cover the raw edge. I learned from some buddy’s of an aluminum extrusion, traditionally used for edging on tile counters. M-D Products part number A813 gives a smooth aluminum extruded finish with a small lip to cover the edge of the carpet and screw holes to attach to the body. The molding is easily formed to the shape of the door opening.Read More →

Build 2 – HM2023 It really helped to have done this once before. And having done it, there were just a few more features to add. The original details are below this update. I moved the outboard lower floor to more resemble the original builds If you’ve ever tried to change the oil and drain an oil cooler, you’ll appreciate the addition of a drain bung to the bottom of the oil cooler Having scraped the nose more than once, I added a chin guard of Stainless Steel. Not visible but it might reduce some scrapes. Build 1 – HM1078 Oil Cooler I chose toRead More →

I’ve been asked numerous times, what I felt was the hardest part about building a car. Undoubtedly, the most difficult part of building a replica car is selecting the color. I’ve always driven red cars, but red is for Ferrari’s. Yellow – Corvette.  Blue? Almost every Cobra is Blue with White stripes – I don’t want to be like everyone else. (The original racing colors were to be white with blue, but Ole Shel’ had some issues with the establishment, so he chose blue with white) My wife has always preferred white cars, she drove a white Miata. Without her, this project would have neverRead More →

Sound and Heat ProofingWe road-trip in an air conditioned Miata – and the footbox on it gets warm. I am paranoid about footbox heat and I don’t think this puppy is going to play nice. To counter the heat, I have gone overboard. I am optimistic it will do the trick. Firewall/FootboxThe exposed portion of the firewall is aluminum. Below it is a layer of Frost King Duct Insulation. (3/16″ dense adhesive foam with a few mil aluminum cover. Next is a layer of heat barrier film that came with the kit. Finally we get to the 3/16″ fiberglass foot tub. On the inside ofRead More →

Paint is the badge by which your build is judged.  With this in mind, I had painted vehicles before, but I wasn’t about to gamble my project. I don’t have the facilities for a quality final paint job. When you consider the actual paint costs, the cost of the labor for the paintjob was really reasonable. As detailed on the bodywork page, I chose to do the rough bodywork and fitting of the panels.  I took the car to my painter on Jan 6th and figured I had “done good” when he commented how well I had done. I chose to use a local source,Read More →

Body on, final assembly begins. Rear Body Mount mod The Hurricane kit comes with the body “hard-mounted” on the rear. The quickjack mounts and tubes sandwich the fiberglass body to clamp it to position. I was concerned this was a long term failure point. I chose to modify the mounting to incorporate rubber bushings. Once the hole location was verified, I opened the hole thru the body to 5/8″ diameter. I then fabricated rubber bushings to make up the space between the 3/8″ bolt and this new hole size. The bushing was 1″ diameter on the outside and held into position with stainless washers. I’veRead More →

Added aluminum to trunk side of rear bulkhead. Planning to line trunk with aluminum and this piece is not accessible with body on. Installed anchor nuts into body for mirrors and demister vents.Read More →

I spent a lot of time viewing pictures of the Hurricane in the body finishing process. I saw a lot of fiberglass filler being used around the various openings. I was looking for spots that were typical to all builds but really didn’t find any. Some filled around the trunk lid, others filled the trunk lid itself. No consistency. I then decided to spend a little extra time mounting each panel so as to minimize the amount of leveling filler needed and to maximize panel adjustment later. Each of the hinges uses three 3/8″ bolts thru a 1/2″ hole to mount the panel. I determinedRead More →

Extending the edges After I positioned my body, I learned the opening for my side pipes was not correct. I would have to gain more clearance on the rear but I would have to extend the forward edge back. Extending the edge concerned me since it was cantilevered. I did some research on the web and found it was recommended that to get maximum bond, the joint should scarfed about 12:1. I decided I would put this taper inside and out and then install a layer of glass at the middle. Once that was solidified, I then built the edge up using Kitty Hair. IRead More →