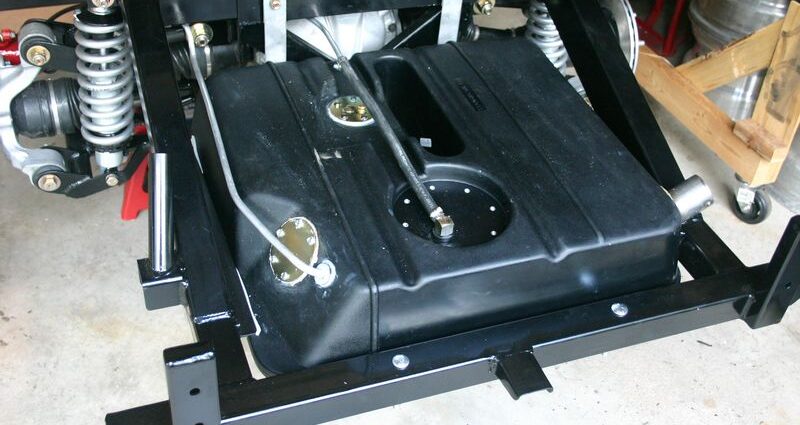
Running fuel lines and need to have motor in place to know where the clutch lever runs. Time to switch focus to finishing motor. I chose to use “yellow death” to anchor the seal to the tank.To those not familiar with building engines, “Yellow Death” is the nickname given to yellow weatherstrip adhesive. It is made by 3M and also by Permatex. It is a contact cement and glues the gasket to the mounting surface. I suspect the name comes from its agressive bonding. You need to be exact when you place the gasket. This stuff holds like you wouldn’t believe. You can’t move the gasket once it is positioned.The trick is locating the nut plate that holds the fitting in place. I fashioned a piece of bailing wire and threaded it thru the holes. With this, I could pull the fitting and bolt plate together and install the screws. The Tanks, Inc. instructions give tips on how to do it using series of installing and twisting bolts but with the sealer in place, it really gets messy. The less you maneuver the pieces, the better your chances of a good seal.The other trick is tightening the gaskets. Tanks, Inc. supplies neoprene gaskets for the block-off plate and filler fitting. Using this is really tricky. Tighten it too much and it squeezes out. Not enough and it doesn’t seal. I continued to get leaks from under the screws. I finally gave up and cut my own gaskets from cork. Finally, success.It’s a good idea to test the tank before mounting. It’s easier to find and fix leaks. I mounted the filler tube and cap and put some vinyl tube on the fill and vent fittings, then filled the tank with water. If it leaks water, it is guaranteed to leak fuel also.The instructions call for plugging the vent hole and adding another next to the fuel filler. I felt the fewer the holes the better. I used a piece of aluminum tube to plug into the existing vent hole and ran it to the vent fitting mounted on the left rear body brace.
This feature has been changed – see new approach
The design of the Hurricane kit requires relocating the fuel tank fittings to the opposite side of the fuel tank. No big deal – till you start to assemble and seal the fittings. Then the fun begins.The fuel filler fitting goes to the rear as close to the rear and top as you can go. But be aware the tank is radiused in this area and you can get into an area that is not flat. Before you start cutting the tank, locate the fitting and look at the surface the gasket is going to be sealing to.I cut the opening with a 2 1/8″ hole saw. One I had from my home construction supplies. Each of the bolt holes was marked and drilled with a 1/4″ drill. Each hole was deburred, as well as the large hole.The Hurricane forum recommends the use of Permatex #3 Aviation grade sealant. The stuff is really messy. I tried three times to make the gasket seal and was not successful. A call to Permatex customer support and they recommended the use of MotoSeal. It is a product designed for motorcycle crankcases. It is a polyvinyl rubber and is impervious to gasoline once it dries. Color is grey, consistency is much like honey. This stuff is just as messy as the #3. I chose to use “yellow death” to anchor the seal to the tank.To those not familiar with building engines, “Yellow Death” is the nickname given to yellow weatherstrip adhesive. It is made by 3M and also by Permatex. It is a contact cement and glues the gasket to the mounting surface. I suspect the name comes from its agressive bonding. You need to be exact when you place the gasket. This stuff holds like you wouldn’t believe. You can’t move the gasket once it is positioned.
 The trick is locating the nut plate that holds the fitting in place. I fashioned a piece of bailing wire and threaded it thru the holes. With this, I could pull the fitting and bolt plate together and install the screws. The Tanks, Inc. instructions give tips on how to do it using series of installing and twisting bolts but with the sealer in place, it really gets messy. The less you maneuver the pieces, the better your chances of a good seal.
 The other trick is tightening the gaskets. Tanks, Inc. supplies neoprene gaskets for the block-off plate and filler fitting. Using this is really tricky. Tighten it too much and it squeezes out. Not enough and it doesn’t seal. I continued to get leaks from under the screws. I finally gave up and cut my own gaskets from cork. Finally, success.It’s a good idea to test the tank before mounting. It’s easier to find and fix leaks. I mounted the filler tube and cap and put some vinyl tube on the fill and vent fittings, then filled the tank with water. If it leaks water, it is guaranteed to leak fuel also.
 The instructions call for plugging the vent hole and adding another next to the fuel filler. I felt the fewer the holes the better. I used a piece of aluminum tube to
 plug into the existing vent hole and ran it to the vent fitting mounted on the left rear body brace.